eLaptopBattery.co.uk's Blog
Your Best Source for Laptop Batteries & AC/DC Adapters


Archive for the ‘keyboard’ Category

How to Replace a MacBook Keyboard

Monday, March 19th, 2012

An Apple MacBook can last some time without the keyboard getting damaged. If the keyboard gets damaged (for e.g. a loose key falls out of the setting) or the user simply wants a new keyboard, he/she will need to replace the keyboard in question. The MacBook has a fairly simple case that users with the correct tools can service.

Note: Later MacBook computers have a “unibody” construction that gives the appearance of tighter seams that are difficult to pry open.

Choosing to replace a MacBook keyboard outside of the warranty period is one way to save money on repair costs. Normally, hiring a professional to replace a keyboard, track pad, or the panel that the keyboard and track pad are in costs much more. A replacement keyboard and track pad panel of the same model can usually be found for sale online at auction sites such as eBay or through trusted parts dealers.replace macbook keyboard How to Replace a MacBook Keyboard

Items needed:

  • Size #00 Phillips screwdriver – This is a necessary screwdriver that is small enough to fit all of the screws that will be removed from the MacBook.
  • A Spudger tool (or other prying tool) – This is a tool that is designed to easily pry open the case and unsnap the areas where the keyboard is attached to the MacBook.
  • A replacement keyboard from the same MacBook model – A new keyboard will more than likely be the best option as the panel houses both the keyboard and the track pad for the computer.
  • Somewhere to sort the screws removed (empty egg carton, ice cube tray, sticky tape) – Many screws will be removed from the computer and they should not be mixed up.

How to Replace the Keyboard Panel

Monday, March 19th, 2012

1) Move to a location where the MacBook can be worked on with little risk of dropping or losing parts.

2) Discharge any static electricity that may have been collected by touching a grounded metal object.

3) Remove the battery pack located on the bottom of the MacBook.

4) Use a coin or other flat hard object to change the battery lock to the open position and pull out the battery.

5) Unscrew the “L” shaped metal piece from the edge of the battery enclosure. It has three screws that remain on the metal piece when it is removed.

6) Remove three screws from the bottom of the MacBook. One (shorter screw) is located in the center of the MacBook and the other two are near the edge, opposite to the battery enclosure. Set the screws aside into the designated sorting area.

7) Remove three more screws from the battery enclosure area, underneath where the “L” shaped metal piece was. The center screw is smaller than the other two surrounding it.

icon cool How to Replace a MacBook Keyboard Place these screws in the designated sorting area’s next compartment.

9) The battery enclosure’s right wall has two more screws on the furthest edges away from the battery connector. The screws right next to the battery connector should be left alone and remain in the wall. Place the two that were removed into the screw sorting area’s next compartment.

10) The wall of the battery enclosure closest to the edge of the MacBook has 4 screws that need to be removed. A total of ten screws are on this wall. Remove only the second, fourth, seventh, and ninth screws starting from the left.

11) Set these screws into another one of the compartments of the sorting location.

12) Turn the MacBook so that the back hinge faces you and remove the four screws. There are two smaller ones on the left and right edges. The other two are larger. Set these screws aside in the sorting area’s next compartment.

13) Turn the MacBook so that the optical drive side faces you. There should be two screws closest to the battery enclosure. Set these aside into the sorting area’s next compartment. The screws on the other side of the MacBook do not need to be removed.

14) The keyboard and track pad panel can now be removed from the MacBook. Use the spudger or another prying tool to gently pry open each panel’s edge.

15) Once the edges have all been loosened, take care to pull up the panel and remove the ribbon cable from the center of the logic board. This step is best performed by opening the black tab on the ribbon lock then pulling the ribbon straight up when holding the base closest to the logic board.

16) This panel can now be replaced with the other panel to be switched in. Tuck in the ribbon cable and close the black tab to secure the cable in place.

17) Gently align the panel into place and press it down into the MacBook case to set it in.

18) Close the display down and replace the two screws from the optical drive side then the four on the MacBook’s back side.

19) Replace the four screws from the battery enclosure wall that had ten screws total, the two screws on the battery connector side of the enclosure, the three screws that originated underneath the “L” metal bar, then the three that were removed from the bottom of the MacBook.

20) Replace and re-tighten the “L” shaped piece of metal into its respective location and replace the battery and lock it into place.

21) Turn the computer right side up and turn it on. Let the OS boot test out the keyboard and track pad. Ensure that all of the keys on the keyboard work correctly and that there are no problems with the track pad. If there are some issues, it is best to troubleshoot them and repeat the steps to fix the ribbon cable or determine any other problems that may be causing the faulty keyboard and or track pad.

Note: If there is a warranty on the MacBook pro and the problem occurs within the servicing period, a professional servicing is recommended. This will prevent user errors and reduce the possibility of causing harm to the computer’s inner parts or casing.

Keyboard Replacement

Monday, March 19th, 2012

for quite a while now (almost 5 years) and it has been quite an adventure. The basic UI it came with was perfect (as I don’t want to spend hours and hours trying to figure out how to open my media player with 1 button). Leading me to my basic and very important need for a new gaming keyboard.

My new keyboard will need to have media controls…that open things besides Windows Media Player (Ituns, Spotify, etc). I despise WMP and often click to use my music without a thought. It’s convenient and a luxury I no longer choose to live without. I don’t care whether the KB is mechanical or not as long as the keys aren’t squished together, raised to ridiculous “ergonomic” heights, or covered in a rubber that will fade in a few months.

My reclusa has just one button that the letter has faded from in it’s 4 years of use, I think that’s pretty awesome when world of warcraft is basically just spamming one button for hours at a time.

I would like my new KB to have macro keys besides the media panel (which I’m assuming all gaming KBs come with today) and as user-friendly as possible. I looked up the BlackWidow linked as the “Unicorn” KB on MMO’s Setup of the Month and found that quite a few people are experiencing issues with keys becoming stuck in some way or another or just failing to work at all…something like 8-9%. I don’t want to play the lottery when I’m spending this much money on a luxury item. The “Narwhal” keyboard G110 seemed fantastic until I realized the keys are TINY, smaller than my laptops keyboard. This is just unacceptable.

So all-in-all guys (and gals), I am looking for your kind help. If you’ve got the perfect KB (or maybe have owned one in the past) that meets my needs, please post its name/model! Very much appreciated

Also, what the hell is the big deal with “mechanical” keyboards?

Req. Again:
1) Keys that won’t fade
2) Keys the standard (or close to) size
3) Media controls (for things besides WMP)
4) Easily programmable macro keys
5) Backlit (Could be red, white, and blue as long as it lights up with some form of lighting)
6) Not required but would be nice, headphone jack that does not cut out any sound

Repair Help-How to replace the keyboard for HP Compaq DV6 series laptop

Saturday, March 17th, 2012

If you have to replace the keyboard, below are the laptop repair help steps you should follow:

1. Remove sticky tape securing the keyboard cable to back of the keyboard. Part of the keyboard cable is glued to the keyboard. Carefully separate the cable from the keyboard.

2. Start peeling off the aluminum protective film and remove it.

3. After the protective film is removed it’s really hard to attach it back to the keyboard because it’s deformed. Most laptop keyboards have some kind of plastic separators. These separators secured on the back of the keyboard. Plastic pins are melted on the back of the keyboard and retain separators in place. Push all plastic pins though wholes on the keyboard. Start removing the separator. The plastic separator has been removed.

4. Before you start removing key caps, make a picture or xerocopy of the keyboard so you know the order in which keys are attached to the HP laptop keyboard . In order to remove the key cap carefully lift it up with your fingers.Remove the key cap so the hinge underneath stays connected to the keyboard. Some big keys have a different design. In addition to the hinge, some big keys (Back space or Space bar for example) might have an additional support bracket. Remove the key cap with the support bracket. As you see, the key hinge stays connected to the keyboard.

5. Some laptop keyboards might have blank covers on the left and right sides from the up arrow key. Lift up and remove the blank cover. All keyboard key caps and plastic separators have been removed.

6. Now you can start removing key hinges – key lifting mechanisms.Carefully separate the key hinge from the keyboard. Each key hinge has two parts – external and internal pieces. When you remove the hinge, try to keep these parts connected to each other the same way they are connected on the keyboard. If the external and internal pieces got separated, you can assemble them together. On the following picture you see the lifting mechanism (hinge) assembled. As I mentioned at the beginning, I’m taking this keyboard apart just for fun. That’s why I don’t care about removed parts. If you following this guide to repair the keyboard, I would recommend to keep all hinges in the right order.

7. The keyboard has two sheets laying one on the top of another. Remove the sheet with silicone (or rubber) nipples.

8. Remove the second sheet with traces. Both sheets have been separated from the keyboard base. The sheet with traces has two layers and all traces are running between these layers.

9. In order to access and repair traces you’ll have to separate to layers from each other. Congratulation, the keyboard has been disassembled.

Understanding The Iphone And Android Press Notifications

Saturday, March 17th, 2012

Push notifications are an powerful method of maintaining you alerted and up to date with anything that requires your consideration. They may be produced to make points a lot easier for you personally as well as offer a better use of your gadget, because you no lengthier need to manually check your e-mail accounts and eat your phone’s battery. The iPhone push notifications are various alerts that could notify you every time you get one thing. Also, both iPhone and Android push notifications may be customized, so that you are going to not be overcome with lots of alerts that can distract you from what else you’re performing.


There’s a notification middle that alerts you of all of the iPhone drive notifications you obtain. They are able to turn into obvious to you personally by enjoying short sounds, displaying a badged number on your software or exhibiting an notify communication within the screen of one’s telephone. Due to the fact you might not hear the audio, for you might not have your telephone all over the place around you, you’ll be able to basically look at the number of acquired email messages and other alerts within the shown number proven within the icon of your software. Android drive notifications are merely good! As you’ll be able to see, builders attempt to make your mobile device a lot more functional and indispensable. Otherwise long in the past cells had been utilised only to communicate with other persons and text messages, now you’ve got an entire computer integrated which, with the help of the astounding android push notifications.


Furthermore, you may always find out which application is set on the iPhone drive notifications by merely checking on your settings and then the notifications tab. In case you are annoyed by a lot of alerts, you can constantly adjust and disable them, from the same settings menu, talked about above. You’ll be able to set up iPhone or android press notifications for mails, Twitter apps, Facebook and so forth. To be able to see your iPhone thrust notifications, you need a WiFi connection, for this assistance makes use of a long term opened IP link, to enable you to read all your alert messages. If you are not knowledgeable about specific notifications, then attempt certainly one of the next: examine if the application supports Android drive notifications, just after installation open up the app to begin getting alerts and also make sure that you are logged in for your account and verify the stay connected button. Also check again for that settings to ensure that they are enabled and in case you are nevertheless encountering trouble using the iPhone and android thrust notifications, then verify your internet link to make sure your firewall enables accessibility to the technique.

The best way to Change a HP Laptop Keyboard

Saturday, March 17th, 2012

Do you know how to change a HP laptop keyboard? It is really much simpler than you may believe. In this short article, I’ll give you the simple steps needed to get the job done. They’re based on several years expertise fixing computers for 3 large organizations. I think you’ll discover it useful.

The first thing you have to do is to get rid of the old HP  keyboard. You may be replacing it simply because none of the keys work or because some of them do not work. Either way, those old keyboards are generally not of any use. By all indicates, keep it handy but personally I don’t suggest that.

To get to the old HP  keyboard, you need to eliminate the access panel. Generally this is above the first row of keys and you need to be able to see one or two grooves to assist you. In either case, you still need a screwdriver most of the time. Indeed, you may damage the panel slightly but that is nothing to be concerned about, simply warning the person before you do it.

Once the panel is removed, the HP  keyboard should easily come out. It is connected to the primary board via a ribbon cable which is easily detached. So, connect the ribbon cable. Secondly, put the access panel back on. It ought to click into place. Some laptops use screws too. In those cases, you’ll need a little screwdriver. You will not need to put any screws back in. While you’re at it, I recommend you get rid of all of the nasty stuff under your keyboard.

HP Touchpad Keyboard Review – On An Android Tablet

Saturday, March 17th, 2012

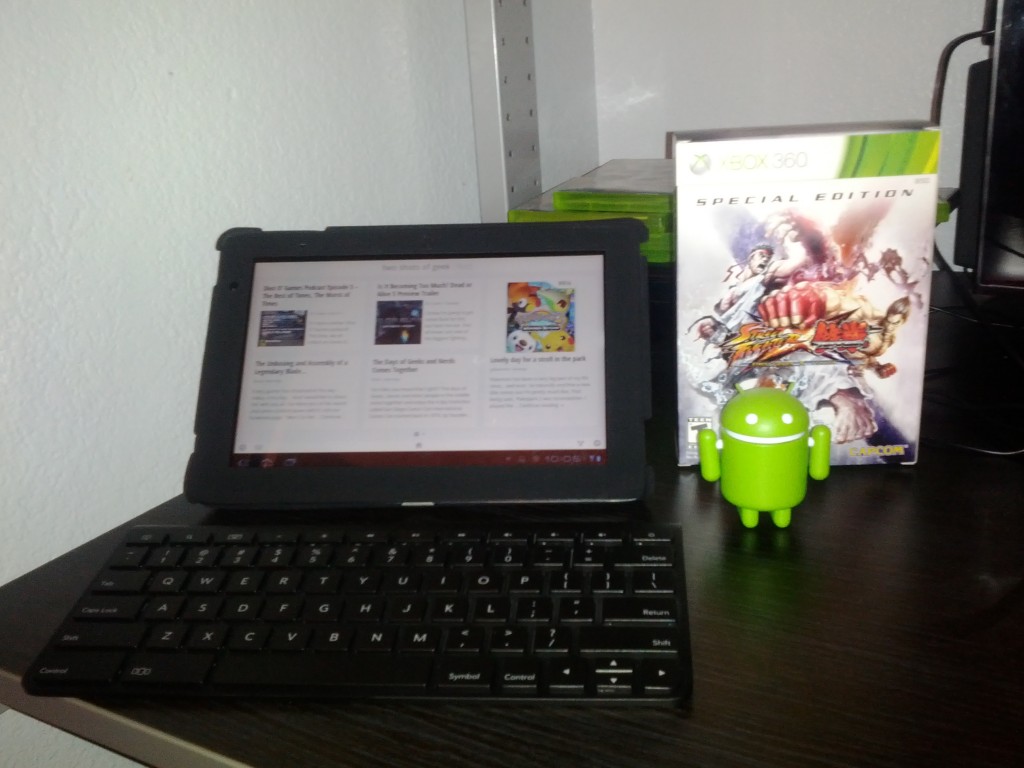
Ever since I got my Acer Iconia A500 Tablet, I’ve been excited about the productivity possibilities of having such a tool available, mainly for updating you all on all things geek. I know I can’t do that on a Touchscreen keyboard, it would take way too much time. I’m always looking for inexpensive ways to accomplish things, and being a geek, I look for unconventional methods as well. I knew I needed a keyboard, but I didn’t want to spend a lot of money.

In a recent trek through a local retailer I found some HP Touchpad Keyboards on clearance. These are bluetooth keyboards, so I couldn’t pass up the chance to pick one up and try it(got it for $5). Did it work? If you haven’t guessed by now it did, but how’s everything?

I looked it up online first to see if I had to jump any hoops or install any extra software to make this keyboard work on my Android Tablet. A few posts I read said I would have to do some extra steps to make this work. Guess what? I didn’t. All I had to do was turn on the keyboard, enable bluetooth on my Tablet, then pair them up. I had to type in an unlock code on the keyboard, and that was it. I was rolling! I was so happy it was so simple. Like I usually say…it was delicious :)

The keyboard is your standard portable bluetooth keyboard, very similar to models by Targus and Logitech. It runs on two AA batteries, and it has a small bump on the back, which angles it a bit to make it more comfortable to type on. There is no number pad, but all the numbers are represented like a standard keyboard, you don’t need to hit function keys to use them. Right above the number row there is a row of shortcut keys, which are designed to work on an HP Touchpad. I tried them all, and amazingly enough some of them work. The volume up and down keys work, as well as the play/pause key. I didn’t expect any of them to work so this is definitely a bonus. I hope someone makes a patch or hack to rig them to work, as a home or back button, for instance. I’ve typed all this up in a few minutes, and so far I don’t feel any discomfort. However, I can tell that very long sessions would probably hurt your wrists, so try to keep typing sessions to a decent level, not hardcore.

Overall I am really happy with this keyboard. It was a steal for the price I paid, and I can easily say it’s easily worth at least $20 for those who can find it on clearance or on Ebay to use with their Android device. It was easy to pair, and it works with no problems. I know I will be using it a lot on the road with my Iconia Tablet, for lots of different activities. Ah, productivity, you are definitely a geek trait as well.

HP Wireless Elite Keyboard and Mouse

Saturday, March 17th, 2012

  • Silent operation: High-tech scissor switch keyboard design offers a quiet experience.
  • Wireless freedom: Free yourself from wires with wireless keyboard and mouse – up to 32 feet. Advanced 2.4GHz wireless technology for less delays or dropouts.
  • Get more control: Control your entertainment experience with a comprehensive set of multimedia keys. Convenient access for multimedia controls – 3-buttons for easy volume control. HP TouchSmart PC hot keys.
  • High-performance optical mouse: 800 dpi high-precision sensor provides precise, smooth and responsive tracking that works on most surfaces. Symmetric design for right or left handed use.
  • Energy efficient: Conserve energy with PC sleep button. Monitor battery level with convenient on screen battery level indicator. Long battery life (keyboard – 12 months typical, mouse – 4 months typical).

hp keyboard and mouse

Upgrade the look of your desktop with ultra-thin and stylish design The HP Wireless Elite Desktop combines style and high-tech key design to deliver an ultra-thin design and silent operation. Built-to-last the HP Wireless Elite Desktop provides full featured keyboard and mouse. Built-to-last, the HP Wireless Elite Keyboard provides a full featured keyboard that combines style and high-tech key design to deliver an ultra-thin design and silent operation. And this package (model FQ481AA) also incl

A glimpse of HP webOS keyboard

Saturday, March 17th, 2012

A glimpse of HP webOS keyboard

HP said that they may build webOS on laptops and computers, and now a webOS keyboard has surfaced over at FCC, signaling that HP is indeed keen to have webOS appear on more products. The keyboard here is wireless and connects using Bluetooth, with a code number KT-1087. Will we see this alongside the HP TouchPad as an optional Bluetooth keyboard accessory? You bet!


A glimpse of HP webOS keyboard

How to Unlock the Dell Fn Key

Saturday, March 10th, 2012

Your Dell laptop‘s “Function” key, which is labeled “Fn” on the keyboard, gives you the option to change settings or toggle features by tapping a combination of keys. Its possible to accidentally lock the “Fn” key if, for example, you drop the laptop or your cat sits on your keyboard. To unlock the “Fn” key, you only need to press two keys simultaneously. Once the “Fn” key is unlocked, you can use it to modify settings such as the display brightness and speaker volume.

Instructions

    • 1

      Press and hold the “Fn” key, which is located in the lower left corner of your keyboard, to the left of the “Ctrl” key and to the right of the “Windows” key. Holding the “Fn” key down, tap the “Num Lk” key at the upper right corner of the keyboard to unlock the “Fn” key.

    • 2

      Hold down the “Fn” key and tap the “F3” key to bring up the Dell battery monitor screen. Tap “Fn” and “F10” together to eject the disk drive.

    • 3

      Hold down the “Fn” key and tap the up arrow key to increase the screen’s brightness, or press the down arrow key to decrease the screen’s brightness. Repeatedly tapping one of the keys increases or decreases the brightness to its maximum or minimum.

    • 4

      Tap the “Page Up” key while the “Fn” key is depressed to manually raise the laptop’s volume. Use the “Page Down” key to lower the volume.

    • 5

      Press “F2” along with the “Fn” key to turn on or off the laptop’s wireless card. Press “F1” with the “Fn” key held down to put the laptop into hibernate mode, which saves power while you aren’t actively using the computer.