eLaptopBattery.co.uk's Blog
Your Best Source for Laptop Batteries & AC/DC Adapters


Archive for the ‘keyboard’ Category

Repair Help-How To Type Wirelessly Using Laptop Keyboard On Android

Saturday, May 19th, 2012

Here, is step by step tutorial to type using laptop keyboard on Android. Typing on Android via laptop keyboard is lot of fun. It can be useful too if you are trying to type something long, or sending lot of SMS. Then instead of meddling with Android keyboard, you can simply type on laptop keyboard, and see it getting typed on your Android phone.

You can easily enable your computer to connect with Android wirelessly and then you can use PC keyboard like SONY VGN-N Series Keyboard  to type on Android phone. Below are the steps to type wirelessly using laptop keyboard on Android.

Steps To Type Wirelessly Using Computer keyboard On Android:

Step 1: Login to Google Play Store on your Android phone.

Step 2: If you have a Barcode Scanner app, then simply scan the QR Code below without accessing Android Market.

Step 3: If you don’t have a Barcode Scanner app, then search for “WiFi keyboard” app in Google Play Store.

Step 4: Install “WiFi Keyboard” app on your Android phone.

Step 5: Launch the app on your Android phone.

Step 6: If you want your Android phone to get connected on a wireless connection, then connect both your Android phone and PC on same Wi-Fi network.

Step 7: When you launch the app on your Android phone, you will find a IP address like address for your computer browser.

Step 8: Launch the browser on your computer. It is recommended that you have Google Chrome browser installed on your computer. Remember that the connectivity doesn’t work on Internet Explorer installed on your computer.

Step 9: Now type the address which is displayed on your Android screen, when you launch the app on your Android phone.

Step 10: Now you will see a typing field interface with instruction on your computer browser.

Step 11: Launch the text field on your Android phone and start typing from your laptop  keyboard. You will see that all the text will be typed automatically in the text field on the wireless connection on your Android.

Apart from typing on Android, you can also access and manage other smart options on your Android phone. I really liked this app when I installed it on my Android phone. It works great on Android. Also, you can connect your Android phone via USB cable and then you can type using laptop  keyboard like DELL Inspiron N4110 Keyboard on Android.

For more laptop repair helps , please visit :

http://www.elaptopbattery.co.uk/

Repair Help-How to Replace a HP Probook 4510 Keyboard

Saturday, May 19th, 2012

Now I will show you how to replace a HP Probook 4510 keyboard 

After you receive a new HP Probook 4510 Keyboard  , you might question the best way to replace the laptop keyboard on your own. Ideas provide you with top tips to follow along with:

First, take away the two screws from the foot of laptops that are holding lower the laptop keyboard bezel. The bezel may be the bar sitting right most importantly the function secrets.

Second, turn your laptop over, open the coverage and place a charge card or guitar pick between your bezel and also the laptop screen. The bezel has pegs relaxing in holes. You have to pry in the bezel gradually. There might be a little of the popping noise when it’s removed.

Third, hold onto the  HP Probook 4510 Keyboard in the finish nearest towards the screen and lightly pull it from the touch-pad finish and switch it over. You can observe the ribbon connected to the bottom from the keyboard. There’s just a little plastic connector holding the ribbon towards the laptop. Pull up carefully around the two tabs to really make it unlock. One tap is situated on each corner from the connector. Be very gentle if you do this because this is among the parts which become damaged most frequently when altering a keyboard. Then your ribbon is going to be launched.

Then, pull the ribbon from the connector carefully and take away it together with the whole keyboard.

Finally, put the  HP Probook 4510 Keyboard face lower to place the brand new keyboard, so you’ve a simple accessibility ribbon. Make certain the laptop keyboard is arranged, then when you switch it go back over the secrets have been in the right position. Keep your ribbon straight constantly. Twisting it’ll damage it. Put the ribbon within the connector. It only gets into one of the ways. Once in correct place, push lower around the connector tabs to lock it. Now switch the laptop keyboard over and slide it lower toward the numbered and go ahead and take bezel and line the pegs track of the holes and push it in position. Then turn laptops over and replace the 2 screws you taken off the underside.

Now you can energy in your  laptop repair helps   if the keyboard works. If it’s working, you’re effective. The next time, whenever you face this type of problem, you may make it solved effectively.

For more laptop repair helps , please visit :

http://www.elaptopbattery.co.uk/

Repair Help-How to Replace the HP Compaq DV6 Series Laptop Keyboard

Saturday, May 19th, 2012

First you should take care of your keyboard on daily work: If you want to thoroughly clean the keyboard, you should disassemble the keys one by one. It will be troublesome, not a easy job to do. So please do not let the computer exposed to excessive dust environment, do not eat or drink on your laptop, especially the flying and juice food, This is not easy to clean, if the juice spilled on the keyboard, it may leak into the internal host. This will be a big effect to your whole laptops. Maybe you need to buy a new laptop. If your HP Compaq DV6 series keyboard is dirty and needs to clean, you should buy a Not lint brush, like a painting brush No.1 or 2. Then Power off your laptop, and carefully clean the keyboards. To this end you had to buy a special small brush to regularly clean out the cracks with a brush carefully the dust and soot, and then swab dipped in a small dedicated HP Laptop Keyboard keys detergent surface, only half an hour, you can make a keyboard, a new look. It is reported that clean-up keyboard can also be the first mechanical watch with a clear and camera lens dust “balloon” after blowing the dust to clear. He is reminding computer users, cleaning and maintenance keyboard connector plug should be pulled off after the cleaning agent should be selected cleaning agents, so that the keyboard’s metal parts from corrosion. then the keyboard can be used again after drying. You may also do the same thing on screens, mouse or other hardwares.

If you have to replace the keyboard, below are the steps you should follow:1. Remove sticky tape securing the keyboard cable to back of the  HP Laptop Keyboard  . Part of the keyboard cable is glued to the  HP Laptop Keyboard  . Carefully separate the cable from the keyboard.

2. Start peeling off the aluminum protective film and remove it.

3. After the protective film is removed it’s really hard to attach it back to the keyboard because it’s deformed. Most laptop keyboards have some kind of plastic separators. These separators secured on the back of the keyboard. Plastic pins are melted on the back of the keyboard and retain separators in place. Push all plastic pins though wholes on the keyboard. Start removing the separator. The plastic separator has been removed.

4. Before you start removing key caps, make a picture. In order to remove the key cap carefully lift it up with your fingers. Remove the key cap so the hinge underneath stays connected to the  Compaq Laptop Keyboard   . Some big keys have a different design. In addition to the hinge, some big keys (Back space or Space bar for example) might have an additional support bracket. Remove the key cap with the support bracket. As you see, the key hinge stays connected to the keyboard.

5. Some laptop keyboards might have blank covers on the left and right sides from the up arrow key. Lift up and remove the blank cover. All keyboard key caps and plastic separators have been removed.

6. Now you can start removing key hinges – key lifting mechanisms. Carefully separate the key hinge from the keyboard. Each key hinge has two parts – external and internal pieces. When you remove the hinge, try to keep these parts connected to each other the same way they are connected on the  HP Pavilion DV6-6000 Keyboard . If the external and internal pieces got separated, you can assemble them together. On the following picture you see the lifting mechanism (hinge) assembled. As I mentioned at the beginning, I’m taking this keyboard apart just for fun. That’s why I don’t care about removed parts. If you following this guide to repair the keyboard, I would recommend to keep all hinges in the right order.

7. The keyboard has two sheets laying one on the top of another. Remove the sheet with silicone (or rubber) nipples.

8. Remove the second sheet with traces. Both sheets have been separated from the  Compaq Laptop Keyboard    base. The sheet with traces has two layers and all traces are running between these layers.

9. In order to access and repair traces you’ll have to separate to layers from each other.

Congratulation, the  Compaq Laptop Keyboard    has been disassembled.

Comfortable Computer Keyboards

Saturday, April 28th, 2012

Comfort is Important!

If you spend as much time as I do in front of the computer screen, comfort is an absolute must have!

Whether you are a Work at Home Dad or Mom, business Owner, Employee, or just use the Computer at Your Leisure a Comfortable Keyboard is essential. What’s needed in a computer keyboard varies from person to person depending on a number of factors

Here we will take a look at some different keyboard styles recently available on

elaptopbattery.co.uk


pc keyboard

http://www.elaptopbattery.co.uk/

How to Play the Piano Using Your Computer Keyboard

Saturday, April 28th, 2012

Every once in a while we run across a cool integration of music and technology.

There is a cool robot playing the saxophone or another improvising drum beats real time. Moreover, Guitar Hero has combined true art with Peavey, the iBand was made for the iPhone to create actual music, a virtual drumset to be used with your iPod is available, and many more.

The MidiPiano Plugin may not be new but is still really cool. Using your regular computer keyboard, you can play every note or key of the piano.

Of course, it would take some time to get used to the placement of the keys, let alone get good at it. Still, it is pretty great for the musician who would either like a break from the real physical piano or perhaps cannot afford one. Furthermore, it would also help any train their ears and abilities…the rest is up to practice.

pc keyboard

http://www.elaptopbattery.co.uk/

The Keyboard Wireless Mini Rii – A Brief Review

Saturday, April 28th, 2012

As indicated on the packaging, the IMN is a mini keyboard. When I mention mini keyboard, I naturally refer to the size of the device, as it is not the same size as a normal PC keyboard. More typical computer keyboard are about 18 x 2 x 8 inches, but this unit is only 5.9 × 2. 3 × 0. 5 inches and weighs in at only 3.2 ounces. It is not only small but it is also lightweight, making it good for transport or keep in a bag when you need on the move. Because it is so small, the IMN integrates perfectly in your hands for a comfortable typing experience.

Photo of Wireless Keyboard

To make it even greener, the K750 is also free of PVC Pls is its construction, with a fully recyclable packaging in the process to reduce its footprint. There is a solar panel integrated to collect all forms of light, you need not worry about carrying around a brick additional pricing or power cables.

We want to say a quick word about our discussion re Mini Wireless Keyboard. What I found is that really just depend on your goals and needs with respect to your unique situation. The most innocuous details may take the most critical keys and the greatest power. The best approach is to try to imagine the effects each would have on you. The rest of this article will present with very hot tips more on this subject.

As for product reviews are on Amazon, generally with 4 or 5 stars. However, as suggested by a quantity of 1, 2 and 3 stars votes, the device may initially look great but be less over time. One observation was that the keyboard didn’t work correctly with a Ubuntu system with a range of 30 feet, but it was rather well in that. Then, a range of 30 ft is reasonably good. If you want to use this media for keyboard you will be pleased to know that there are buttons to control volume and the playlist. This keyboard has just as easily with other buttons, although commonly used, are necessary when you need their.

Of course, this review is not complete if it has not implemented the negatives. Touch pad of the keyboard this mini appears similar to that of a laptop, but it is not accurate, which makes it frustrating sometimes. The touchpad has same issues with the recognition of the valves; However, there are two buttons, the left and right, which can be used also. It should also be raising that the keys are directly under each other and not offset by 50% that we are accustomed with typical keyboards. It takes time to get used to it, but it is not a problem.

From November 15 to go, you can download energy solar PPA the which is a counter of lux which helps you get the light needed to enable it, which makes it a snap to retrieve key information concerning levels of battery at a glance, while being alerted whenever its juice begins to run low.

Photo of Wireless Keyboard

It is a device of great for people looking for a small keyboard that comes with a tactile keyboard. The price is great, and the several advantages that the few negatives seem petty.

pc keyboard

http://www.elaptopbattery.co.uk/

Black Mini Wireless PC Keyboard & Mouse Touchpad

Saturday, April 28th, 2012


Mini Wireless PC Keyboard & Mouse Touchpad Features:
Wireless remote control of your PC up to 10meter
Enhances Internet TV viewing with Remote Control ust like your TV remote controlbr />Adds a professional lecturing and teaching tool to presentations
Compact deisgn, Convenient size, fits in the palm of your hand
USB Dongle included to attach to your PC (Plug and play, no software required)
QWERTY layout keypad
Backlit keyboard for convenient operation in darkened room.
Large touch pad for mouse operation and handwrite (2″)
Rechargeable via your USB port (No batteries needed)
PC USB cable to Keyboard for power recharging
2.4GHz DSSS radio transreceiver, distance up to 10m


Mini Wireless PC Keyboard & Mouse Touchpad Applications:
For the Lecturer, Meeting Presenter, Classroom Teacher, Sales Manager, or anyone using a projected image, the Handheld PC Keyboard and Mouse Touch Pad allows you to stand in front of your meeting and Change slides, Select screen options, Write on the projected image, Emphasize words and objects with dynamically inserted lines, Draw on the projected image dynamically
For people who want to watch Internet TV on their PC compatible TV, via broadband and a PC, like NBC, ABC, FOX and IPTV, you can sit in your easy chair and select your viewing pleasures without walking to your computer to change channels or scroll through options just use Unisens Handheld
PC Keyboard and Mouse Touchpad as an Internet Remote Control

Mini Wireless PC Keyboard & Mouse Touchpad Specifications:
Color: black
Dimension: 85*135*10mm
Net Weight: 180g

How to use a computer keyboard

Saturday, April 28th, 2012

Whenever you use a computer, you’ll probably use a keyboard. The most common kind is referred to as a ‘QWERTY’ keyboard after the keys on the top row of letters. It was invented by C L Scholes in the 1860s when he was working out the best place to put the keys on a manual typewriter.

Follow these step-by-step instructions to help you get to know what your keyboard can do
So that you can carry out the simple exercises below, you’ll need a document open to type into. Read our guides What is WordPad? and How to open WordPad. Then create a WordPad document and go through the following steps.
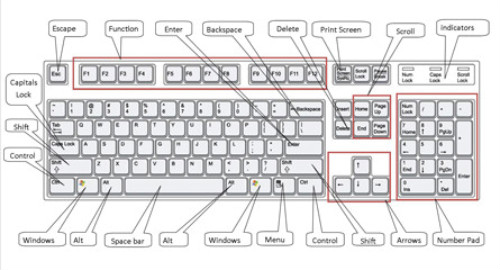
Step 1: Have a good look at your keyboard. The most important keys are labelled on the diagram below:
Click here for an enlarged version of the above diagram, which you can print out for easy reference.
Some keyboards, especially those on laptops, will have a slightly different layout. For example, yours might not have a number pad or the delete key may be in a different place. But virtually all keyboards will have these important keys somewhere.
Step 2: The main keys are the letter keys. When you type just using these, you get lower-case print. However, if you hold down a ‘shift key’ (there are two to choose from) at the same time as you type, you’ll get UPPER-CASE letters.
Try typing your name, including capitals (UPPER-CASE) and spaces. The ‘space bar’ (which you press briefly to make a space) is the wide key at the bottom of the keyboard.
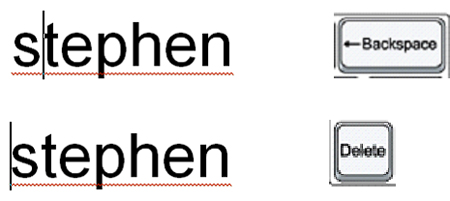
Step 3: If you make a mistake in your typing, there’s always a remedy.
To delete a letter, place your cursor (mouse pointer) just after the letter and click. Then press Backspace briefly. (Always press briefly – otherwise, you’ll get repeated deletions, spaces, letters or whatever.) Or place your cursor just before the letter, click and press Delete.
Step 4: Now try typing a sentence:
This is a good sentence to practise because it contains most of the letters of the alphabet.
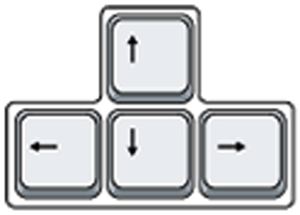
Step 5: You can move the cursor along this sentence without deleting anything by using the arrow keys:
Try moving the cursor backwards and forwards through your sentence.
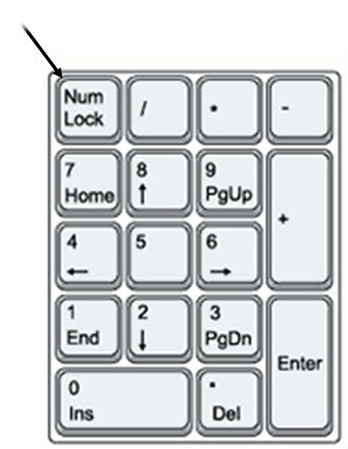
Step 6: Now try using the number pad, if you have one.
To use this to type numbers, you have to press the Num Lock key. There may be an indicator light at the top of the keyboard or on the ‘Num Lock’ key itself to show that it’s on.
Step 7: You can also type using the numbers on the main keyboard. You’ll find them on the row of keys above the top line of letters.
Above these numbers are various symbols, which include ‘£’, ‘&’, ‘!’. To use these, hold down the Shift key while you type. So if you press ’7′ on its own, you get ’7′, but if you press ’7′ while you hold down the ‘Shift’ key, you get ‘&’.
Try typing:
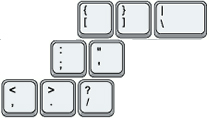
You’ll find similar extra symbols elsewhere on the keyboard:
They operate in exactly the same way as the ones above the numbers.
Step 8: If you want everything to appear in upper case, press the Caps Lock key and then type:
Again, an indicator light may come on to show that your capitals are ‘locked’. Don’t forget to press this key again when you’re finished to turn ‘Caps Lock’ off.
Step 9: The ‘Windows’ key comes in a number of different designs, such as the example to the right.
It does exactly the same thing as the Windows button on the taskbar on your computer screen. You can choose to open the ‘Start’ menu by pressing this key or by clicking the button on the taskbar with your mouse.
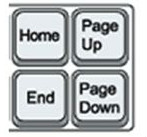
Step 10: There are a number of ways that you can move round a web page. Try using the keys below to see where they take you:
Step 10: You’ll be told to use the ‘Control’ (Ctrl) and ‘Alternate’ (Alt) keys for some operations. When you do so, keep holding down one or the other key or both keys while you press any other keys.
For example, if you press Ctrl, Alt and Delete all at the same time, a menu will open. To make it disappear, press the ‘Escape’ (Esc) key in the top left-hand corner of the keyboard.
Step 11: Some of the things that you use the mouse for can be done with keyboard shortcuts. These require you to hold down one key while pressing another, and often involve using the ‘Ctrl’ and/or ‘Alt’ keys. Some people prefer using them to using the mouse. There are many shortcuts – check out the list provided by Microsoft Support.
pc keyboard

Laptop Keyboard Repair – Replacement

Monday, March 19th, 2012

Before you consider laptop keyboard repair, check out all your options. Why spend all that money if you could do the work yourself? You need to think laptop keyboard replacement not laptop keyboard repair. You potentially could save yourself lots of money. For example, if you happen to own a Compaq Presario, replacing the keyboard is really easy and can be done in just a few minutes. Follow these quick step-by-step instructions to this laptop keyboard repair tutorial.

First, gather your tools. You won’t need many; all you’ll need is a screw driver and a credit card. Yes, I did say credit card, not to purchase anything but to use as a tool to pry up the bezel which you will learn about shortly.

For safety reasons, always make sure you turn off your computer before you start to poke around inside. Now turn it upside down and remove the two screws from the bottom of the computer case. These two screws hold down the bezel which is the bar located right above the “F” keys. Now turn the computer right side up again and take your credit card and wedge it between the keyboard and the bezel and gently pry the bezel up and out of the slots. You want to use something like a credit card that is plastic and has rounded edges rather than say a metal screw driver. You might hear a bit of popping noise as you lift out the bezel but that is normal.

Now you will have the top edge of the keyboard exposed. Take hold of the keyboard at the exposed edge toward the screen and gently lift it up and pull it away from the touch-pad end while slowly flipping it over. You will see the keyboard data ribbon. To remove this ribbon, you need to unlock the little plastic connector that is holding it in place. Do so by pushing down toward the system board and then pull up on the corners. The piece comes straight up, not out, and the ribbon will be released. With the ribbon now free, carefully pull the ribbon out of the connector and remove it along with the entire keyboard.

Finally you are ready to install the new keyboard. Take the new keyboard in your hands and place it upside down so you have easy access to the ribbon. Do not twist the ribbon as this could damage it. Put the ribbon end into the connector and lock it in place by gently pushing down on it. It only goes into the connector one way so there is no confusion about that. Now flip the keyboard over so it is right side up and match the pegs with the slots and push it in place. It is now time to replace the bezel with the two screws. Turn over the computer and replace the two screws you removed from the bottom. Now power on your computer and see if it works. If the keyboard is not working, turn off the computer and check that you properly installed the ribbon and try, try again.

notebook pc keyboard replacement

Monday, March 19th, 2012

When your laptop’s keyboard stops to operate, then certainly it’s a real issue. With out a practical keyboard, you won’t be able to do any work. It’ll cause main delays in your work. The only choice in like a case is to change the keyboard.

You must only make an effort to change the laptop keyboard if you possess the essential experience. If you’re planning on doing it for the first time, it is preferable to go to a computer specialist to obtain the computer keyboard changed. As soon as you open up the notebook on your own, you’ll void the manufacturer’s warranty. Then you’ve any problems with the notebook, you would need to pay for many of the maintenance. So, save time before opting to replace the laptop keyboard by yourself.

So that you can replace the laptop keyboard, first ensure that you have all the necessary tools and also the replacement computer keyboard at hand. Switch off your notebook and detach it from the source of power. Take away the key-board bezel. This is important in order to take out the old computer keyboard. There’ll be a few screws keeping the bezel in place. Unscrew them and maintain apart. When the bezel is eliminated, you will notice fasteners that connect the keyboard to the notebook. There’ll be a couple of them. You’ll also have two data cables. First take away the fasteners and so the data cables. When this is done, you will be able to lift away the keyboard from the notebook. You can now put the new keyboard in position and begin with plugging in the data wires, then linking the fastener screws and thereafter fixing the bezel and screwing it in place.

Now turn on your laptop computer and find out if the new key-board is operating. It ought to be when you have properly connected the data cable connections.